About Me

My photo
Hi there! I'm a mom of 3 boys and happily married to my husband for the past 13 yrs! I work full time and try and take care of everything home related as well- basically I'm tired and loving life! I love to try new things- especially cooking! I love the outdoors, music, old movies, church, and my family!

Tuesday, November 17, 2015

Christmas is coming! Are you ready?

Now is the time of year where everyone is frantically thinking about what to get for everyone on their list and if it will hold a candle to what they gave last year. I'm totally guilty of trying to figure out the best gifts EVER! but I'm also usually prepared 2 months in advance. This year... not so much. I'm drawing a BIG FAT BLANK!! Although, it has made me think about what I'm teaching not only my kids but myself about Christmas... what is the message I'm sending? So I have found two things, yes two that are going to help me and my family (mostly myself and the boys-hubby is good) have a more Christ centered Christmas.

1st: 25 Days of Christmas: http://25daysofchrist.com/

This kit comes with 25 unfinished ornaments, a book to help reference the different objects, and a bag to keep your ornaments in when you're done.
When I saw this I thought it was a great way to help us think of Christmas everyday of the month in December, have a reminder on the tree, and a fun craft to do during the Thanksgiving Holiday (because I have nothing else to do,said no women ever) I'll make sure to write a post when I get mine in the mail and finish!


2nd: 12 Days of Christmas Nativity countdown: http://overthebigmoon.com/12-days-of-christmas-nativity-countdown-printables/

This mom is amazing and had just made this one so easy for the rest of us. Shout out to Pam Dana for this great idea and the FREE printables that are on her website (listed above.) The name pretty much says it all, but what Pam has done is made it possible for the kids to interact in putting up the nativity and giving each object a reference and meaning to the kids. So as they put up the Nativity together piece by piece 12 days before Christmas, they have a better understanding of how important each symbol of the set is and what their role was in being apart of of Saviors birth.
Pam also includes a link to a "kid friendly" Nativity Set, so that way if you're like me and super protective of your Nativity set (like if you touch you die) than it's easy to just order one that goes with her awesome printables and it's not crazy expensive.

I hope you have fun getting ready for the Holidays and make sure to take time and enjoy your family and what the Holidays are really about.

P.S. make sure you check back with me as I will probably be trying so new holiday recipes and you know you don't want to miss out on that!

Tuesday, November 10, 2015

Two thumbs up

So I tried more recipes over the weekend and yesterday and loved them both! Of course I did some tweaking because that's what I do and everyone has different taste. One comes from a FAVORITE site of mine http://www.averiecooks.com and everything I have tried on her page is great! The other is from http://sweetcsdesigns.com/ and I do believe I will be going back to visit her page again. So on to the recipes!!!


http://sweetcsdesigns.com/low-carb-paleo-shrimp-scampi/#more-11223
LOW CARB PALEO SHRIMP SCAMPI

INGREDIENTS
4 zucchini, tops and bottoms cut off
1 lb RAW shrimp- peeled and deveined
3 tbsp to ½ cup butter or ghee, preferably grass-fed; coconut oil can be substituted
1 medium head of garlic- about 10-15 cloves, diced
pepper, to taste
INSTRUCTIONS

In a large pan, melt butter and add garlic on medium heat.
When butter is melted, add zucchini and shrimp and turn heat to high.
Toss zucchini and shrimp often, until shrimp has turned pink.
Top with parmesan cheese to taste, serve hot!
Please note butter is a subjective- If you'd like more of a sauce, add a little more butter. Sometimes you'll have a zucchini that doesnt release as much liquid and you'll need more butter. Add it slowly as you cook so you can gauge how the recipe is coming together to get a texture you like.


Alisha's notes and tweaks- So I was only cooking for my husband and I and I didn't think my hubby was going to really like it so I only used 1 zucchini and 1/2 of shrimp. That was enough for the both of us as an appetizer so if you're making as the entree go for the full amounts. I also bought pre-cooked shrimp to cut down on prep time and mess. I used olive oil and added about a half a TBS. butter at the end. When I was heating the oil I added the garlic and some onion as well as just a dash of cayenne pepper. Turned out delish and the hubby LOVED it too! If you're wondering what or where to get a zoodle maker, I found mine on Amazon (not getting paid to mention this) http://www.amazon.com/gp/product/B00J19AR7W?psc=1&redirect=true&ref_=oh_aui_detailpage_o02_s00

http://www.averiecooks.com/2015/10/easy-30-minute-homemade-white-chicken-chili.html
EASY 30-MINUTE HOMEMADE WHITE CHICKEN CHILI
YIELD: about 8 to 10 cups PREP TIME: 10 minutes COOK TIME: 20 minutes TOTAL TIME: 30 minutes
INGREDIENTS:

3 tablespoons olive oil
campaignIcon
3 cups sweet Vidalia or yellow onion, peeled and diced small (about 2 medium/large onions)
1 large jalapeno pepper (about 4 to 5 inches long), diced very small (the seeds are where the heat is concentrated; included or discard them based on preference)
7 to 8 ounces canned green chilis, don't drain (I used mild heat)
4 garlic cloves, peeled and finely minced
32 ounces (4 cups) low-sodium chicken broth
4 cups shredded cooked chicken (use about 1 whole storebought rotisserie chicken to save time; or roast or cook your own chicken in a skillet)
two 15-ounce cans cannellini beans, drained and rinsed (see step 4 below about blending 1 cup of the beans with a splash of chicken broth or water)
1 tablespoon lime juice
1 tablespoon cumin
1 teaspoon dried oregano
1 teaspoons salt, or to taste
1 teaspoon black pepper
1/2 teaspoon red chili flakes
1/4 teaspoon cayenne pepper, optional and to taste
1/3 cup fresh cilantro leaves, finely minced
tortilla strips, chips, crackers, diced avocado, shredded cheese, and/or sour cream; all are optional for garnishing

DIRECTIONS:
To a large Dutch oven or stockpot, add the olive oil and heat over medium-high heat to warm.
Add the onion, jalapeno, green chilis, and sauté for about 7 minutes, or until vegetables begin to soften. Stir intermittently.
Add the garlic and sauté for 1 to 2 minutes. Stir intermittently.
Add the chicken broth, chicken, cannellini beans including whole beans and blended bean mixture (take 1 cup of the beans, add to a food processor or blender, add a splash of chicken broth or water and blend until smooth; mixture should be thick. Add the blended bean mixture along with the whole beans to pot), lime juice, cumin, oregano, salt, pepper, red chili flakes, optional cayenne pepper, and bring to a boil. Allow mixture to boil gently for about 7 to 10 minutes. It's unlikely, but if at any point the overall liquid level looks low or you prefer your chili to be thinner, add 1 cup of water or as desired; you'll adjust the salt and seasoning levels at the end. For thicker chili, allow mixture to boil longer and reduce until desired thickness is reached.
Add the cilantro and boil 1 minute.
Taste chili and add salt to taste. This will vary based on how salty the chicken broth, beans, and rotisserie chicken are, and personal preference. Make any necessary seasoning adjustments (i.e. more salt, pepper, cumin, cayenne, lime juice, etc.).
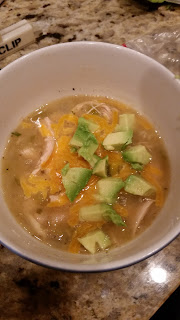
Ladle chili into bowls, and optionally garnish with tortilla strips, chips, crackers, avocado, cheese and/or sour cream; serve immediately. Chili will keep airtight in the fridge for 5 to 7 days or in the freezer for up to 6 months.

Alisha's notes and tweaks-I didn't tweak much on this at all. I did a little less onion, didn't add the red pepper flakes, and for being a Texas gal we don't do spicy at our house (even my husband) so the next time I make it I will omit the jalapeno.

Hope you all enjoy!!!


Thursday, November 5, 2015

Tried it and loved it!

So I'm eating clean and doing a pretty good job at keeping it but.... I NEED CHOCOLATE!!! I have tons of recipes "pinned" so I thought I would put one to the test. Well it passed!!! thanks to  Monique  @  http://www.ambitiouskitchen.com/ I have a yummy clean snack to curb my sweet tooth and not feel the quilt or the calories later. So without further ado here's the recipe and my little tweaks:

Healthy Banana Bread Chocolate Chip Oat Breakfast Bars:


INGREDIENTS
  • 2 1/4 cups gluten free oats
  • 1/2 teaspoon aluminum free baking powder
  • 1/2 teaspoon baking soda
  • 1/4 teaspoon salt
  • 1 teaspoon cinnamon
  • 3 medium ripe bananas
  • 2 teaspoons pure vanilla extract (gluten free, if desired)
  • 1/4 cup unsweetened applesauce
  • 1/4 cup honey (agave nectar if vegan)
  • 1/3 cup chocolate chips (vegan, if desired)
  • For chocolate drizzle:
  • 2 tablespoons chocolate chips (vegan, if desired)
  • 1/2 teaspoon coconut oil

INSTRUCTIONS
  1. Preheat oven to 350 degrees F. Spray 9x9 inch baking pan with nonstick cooking spray.
  2. To make oat flour: Place oats into blender or food processor and blend for 1-2 minutes until oatmeal resembles flour. You may need to stop blender and stir oats a couple of times to ensure that all oats have been blended. Transfer oat flour medium bowl; whisk in baking powder, baking soda, salt and cinnamon; set aside.
  3. Place bananas, vanilla, applesauce, and honey into blender; blend 1-2 minutes or until smooth and creamy. Add to oat flour mixture and mix until just combined.
  4. Gently fold in 1/3 cup of chocolate chips. Pour batter into prepared pan, spreading evenly with rubber spatula. Bake for 15 minutes or until knife inserted into center comes out clean or with just a few crumbs attached. Cool 10-15 minutes on wire rack.
  5. Prepare drizzle by adding 2 tablespoons of chocolate chips and coconut oil in microwave safe bowl. Microwave on high 30 seconds; stir well to combine then drizzle over the top of bars. Cut bars into 16 squares and enjoy!


My personal note: I used agave nectar and I didn't have any coconut oil on hand so I just mixed a little almond milk to the chocolate chips and it worked great!

Monique has some great tips so go see her site and what wonderful things she has to offer! http://www.ambitiouskitchen.com/2014/02/healthy-banana-bread-chocolate-chip-oat-breakfast-bars-vegan-gluten-free/

Enjoy and as always I would love to hear for you!


Monday, November 2, 2015

On to Thanksgiving!!!

Halloween was fun but now it's over and the candy remains....forever! But I'm excited because I LOVE FALL! I live in Texas so I don't have a ton of beautiful big leaves all different colors and cold fall days but nevertheless I decorate like crazy, burn the pumpkin spice candles, and spend more time outside.

As stated in the last post I am participating in Skinnymom.com "30 Day of Thanks" challenge and will be posting on Instagram, Facebook, and here what I have to be grateful for.

Nov. 1st Day 1: Yesterday just happened to be my 12 yr. anniversary with my husband so of course I am grateful for him and the amazing life we have built together.

Day 2: My 3 amazing boys! They test me and teach me new things everyday.


Let's remember to be grateful this upcoming holiday season and start by taking the 30 day challenge. I look forward to seeing all my fellow Resident Moms on Instagram and all their blessings.