http://sweetcsdesigns.com/low-carb-paleo-shrimp-scampi/#more-11223
LOW CARB PALEO SHRIMP SCAMPI
INGREDIENTS
4 zucchini, tops and bottoms cut off
1 lb RAW shrimp- peeled and deveined
3 tbsp to ½ cup butter or ghee, preferably grass-fed; coconut oil can be substituted
1 medium head of garlic- about 10-15 cloves, diced
pepper, to taste
INSTRUCTIONS
In a large pan, melt butter and add garlic on medium heat.
When butter is melted, add zucchini and shrimp and turn heat to high.
Toss zucchini and shrimp often, until shrimp has turned pink.
Top with parmesan cheese to taste, serve hot!
Please note butter is a subjective- If you'd like more of a sauce, add a little more butter. Sometimes you'll have a zucchini that doesnt release as much liquid and you'll need more butter. Add it slowly as you cook so you can gauge how the recipe is coming together to get a texture you like.
Alisha's notes and tweaks- So I was only cooking for my husband and I and I didn't think my hubby was going to really like it so I only used 1 zucchini and 1/2 of shrimp. That was enough for the both of us as an appetizer so if you're making as the entree go for the full amounts. I also bought pre-cooked shrimp to cut down on prep time and mess. I used olive oil and added about a half a TBS. butter at the end. When I was heating the oil I added the garlic and some onion as well as just a dash of cayenne pepper. Turned out delish and the hubby LOVED it too! If you're wondering what or where to get a zoodle maker, I found mine on Amazon (not getting paid to mention this) http://www.amazon.com/gp/product/B00J19AR7W?psc=1&redirect=true&ref_=oh_aui_detailpage_o02_s00
http://www.averiecooks.com/2015/10/easy-30-minute-homemade-white-chicken-chili.html
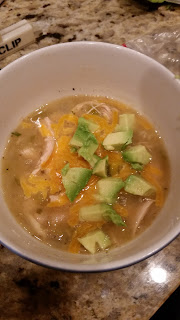
EASY 30-MINUTE HOMEMADE WHITE CHICKEN CHILI
YIELD: about 8 to 10 cups PREP TIME: 10 minutes COOK TIME: 20 minutes TOTAL TIME: 30 minutes
INGREDIENTS:
3 tablespoons olive oil
campaignIcon
3 cups sweet Vidalia or yellow onion, peeled and diced small (about 2 medium/large onions)
1 large jalapeno pepper (about 4 to 5 inches long), diced very small (the seeds are where the heat is concentrated; included or discard them based on preference)
7 to 8 ounces canned green chilis, don't drain (I used mild heat)
4 garlic cloves, peeled and finely minced
32 ounces (4 cups) low-sodium chicken broth
4 cups shredded cooked chicken (use about 1 whole storebought rotisserie chicken to save time; or roast or cook your own chicken in a skillet)
two 15-ounce cans cannellini beans, drained and rinsed (see step 4 below about blending 1 cup of the beans with a splash of chicken broth or water)
1 tablespoon lime juice
1 tablespoon cumin
1 teaspoon dried oregano
1 teaspoons salt, or to taste
1 teaspoon black pepper
1/2 teaspoon red chili flakes
1/4 teaspoon cayenne pepper, optional and to taste
1/3 cup fresh cilantro leaves, finely minced
tortilla strips, chips, crackers, diced avocado, shredded cheese, and/or sour cream; all are optional for garnishing
DIRECTIONS:
To a large Dutch oven or stockpot, add the olive oil and heat over medium-high heat to warm.
Add the onion, jalapeno, green chilis, and sauté for about 7 minutes, or until vegetables begin to soften. Stir intermittently.
Add the garlic and sauté for 1 to 2 minutes. Stir intermittently.
Add the chicken broth, chicken, cannellini beans including whole beans and blended bean mixture (take 1 cup of the beans, add to a food processor or blender, add a splash of chicken broth or water and blend until smooth; mixture should be thick. Add the blended bean mixture along with the whole beans to pot), lime juice, cumin, oregano, salt, pepper, red chili flakes, optional cayenne pepper, and bring to a boil. Allow mixture to boil gently for about 7 to 10 minutes. It's unlikely, but if at any point the overall liquid level looks low or you prefer your chili to be thinner, add 1 cup of water or as desired; you'll adjust the salt and seasoning levels at the end. For thicker chili, allow mixture to boil longer and reduce until desired thickness is reached.
Add the cilantro and boil 1 minute.
Taste chili and add salt to taste. This will vary based on how salty the chicken broth, beans, and rotisserie chicken are, and personal preference. Make any necessary seasoning adjustments (i.e. more salt, pepper, cumin, cayenne, lime juice, etc.).
Ladle chili into bowls, and optionally garnish with tortilla strips, chips, crackers, avocado, cheese and/or sour cream; serve immediately. Chili will keep airtight in the fridge for 5 to 7 days or in the freezer for up to 6 months.
Alisha's notes and tweaks-I didn't tweak much on this at all. I did a little less onion, didn't add the red pepper flakes, and for being a Texas gal we don't do spicy at our house (even my husband) so the next time I make it I will omit the jalapeno.
Hope you all enjoy!!!


Can't wait to try the recipes. Thanks Alisha
ReplyDeleteLet me know what you think!
Delete